Camera Control
Our viewer is now able to render 3d models with a basic normal shader. You can also control the camera with a "First Person Camera Controller". While this kind of controller can be good for video game, we generally don't use that for production or viewer applications.
A more common camera controller is the TrackballCamera. We will implement that in the second part of this section. We will first try to compute a better default camera when no camera is specified on the command line.
The Camera model
A camera is generally represented by three points: - an eye: the position of the camera - a center: where the camera is looking at - an up vector: which direction is up relative to the axis [eye, center]
These three points are enough to compute a view matrix with the glm::lookAt function.
It's important to understand that the Camera model is more powerful than the concept of matrices: you can compute a single view matrix from a camera, but for a single view matrix, there is an infinite number of camera (all cameras with the same position, orientation, but with a different center along the camera z axis).
That's why we choose to manipulate a Camera from the inputs rather than a view matrix.
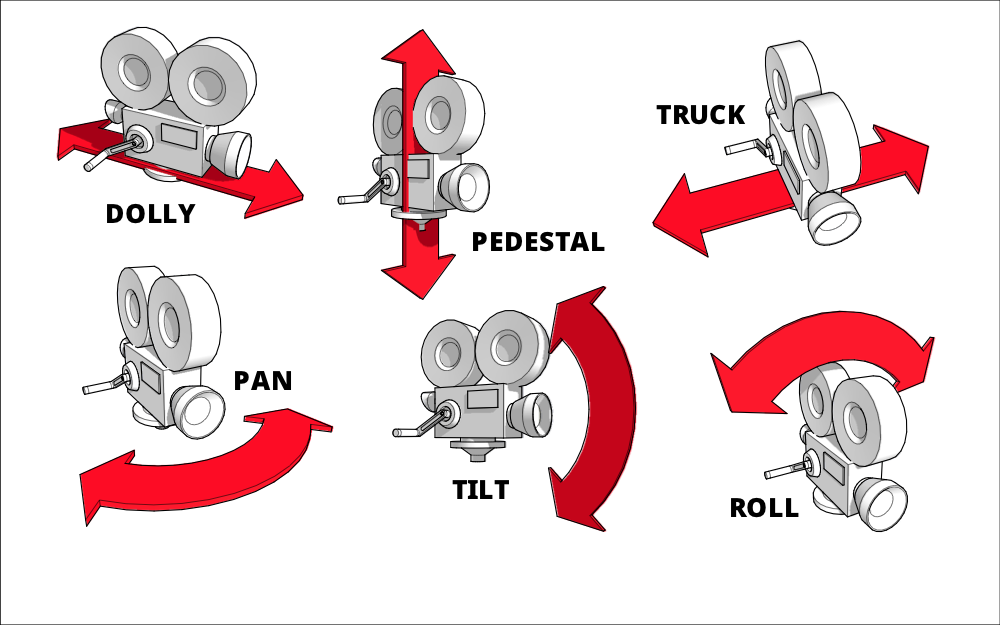
In terms of code, the Camera class is defined in cameras.hpp. I've implemented a bunch of operations for reference but it's likely we won't use them. Each operation correspond to the terminology of real cameras, and you can find more information atthe following link and in the figure below. - http://learnwebgl.brown37.net/07_cameras/camera_movement.html
Implementing a better default camera
Right now our default camera is simple:
1 2 3 | |
This correspond to the default view of OpenGL. It gives an identity view matrix (by default we look at the negative z axis with OpenGL).
Our goal is to implement a default camera that is better for our scene. It will not be amazing for some scenes, but most standard objects will be well presented.
The idea is to use the bounding box of the scene and compute our parameters from it. A bounding box is defined by a lower point bboxMin and higher point bboxMax. We want to have our center point at the center of the bounding box of the scene, and to look at it from the diagonal, far enough to see most of the scene.
What is the formula for the center point of the bounding box defined by bboxMin and bboxMax ?
What is the formula for the diagonal vector going from bboxMin to bboxMax ?
To compute the bounds of the scene, I've implemented a function in utils/gltf.hpp:
1 2 | |
(the function is not too complicated, but it is quite similar to what we already did to build VAOs and draw the scene, you can take a look if you want or even try to reimplement it without looking).
After loading the scene, use this function to compute the bounding box of the scene.
For the next todos you might need to reorder a bit the run() function: load the scene before computing matrices.
Replace the default camera with a camera such that center is the center of the bounding box, eye is computed as center + diagonal vector, and up is (0, 1, 0). (ideally the up vector should be specified with the file, on the command line for example, because some 3d modelers use the convention up = (0, 0, 1)).
Test your code on Sponza and DamagedHelmet.
A special case we need to handle is flat scenes (like a single triangle). In that case, we need to use align our view with a vector orthogonal to the scene. We will only handle flat scenes on the z axis.
What is a condition to test if the scene is flat on the z axis ?
It the scene is flat on the z axis, use this eye point instead: center + 2.f * glm::cross(diag, up);
To finish improving our camera, we will also improve the projection matrix and the controller speed.
Use the diagonal vector to compute a maximum distance between two points of the scene. If it is zero, set it to 100. instead.
Use near = 0.001f * maxDistance and far = 1.5f * maxDistance to compute the project matrix (the call to glm::perspective).
Set the camera controller speed (second argument of the controller) to a percentage of the maxDistance. Try different values and choose one that suits you.
Trackball camera controller
Now our goal is to implement a new camera controller. The trackall controller should offer the following functionalities:
- Rotate around center with middle mouse pressed
- Move on plane orthogonal to the view axis with shift+middle mouse pressed
- Dolly in/out with ctrl+middle mouse pressed
It you have Blender 2.8 installed, this are the control offered by the camera. This kind of controller is very important for a viewer because we generally want to rotate around a loaded model and zoom towards it.
The big part of the code must be done in the update() method of TrackballCameraController which is empty for now. We will do that in multiple step. The first step is super easy:
In ViewerApplication::run() replace the FirstPersonCameraController by a TrackballCameraController.
If you try the code right now, the camera should be "locked", we need to implement the update() method.
First we need to gather user inputs: is the middle button pressed ? how did the mouse moved since the last update ? is shift or ctrl pressed ? All of this must be done with functions from glfw in a way very similar to FirstPersonCameraController::update().
Implement the beginning of TrackballCameraController::update() by taking example in FirstPersonCameraController::update().
Then we need to isolate three cases: is shift pressed ? in that case we want to pan the camera (lateral movement orthogonal to the view direction). Is ctrl pressed ? in that case we want to zoom/unzoom toward/backward the target. And if no keyboard key is pressed, we just rotate aroung the target.
Add the tests for the various possibilities and extract meaningful parameters from the mouse movements. For pan and rotate we need horizontal and vertical movements. For zoom we need only horizontal movement (going right will zoom, going left will unzoom).
Implement the "pan" case. This one is the easier, you just need to use the moveLocal method of m_camera with the correct parameters (movement only on x and y axis of the camera, no move on z).
The zoom case one is a bit harder, the camera need to move along its view axis, but only the eye should move, not the center. We cannot use moveLocal because it moves both the eye and the center. Also we need to be careful to always keep eye != center (but you can ignore that initially and fix it later).
So if we define const auto viewVector = m_camera.center() - m_camera.eye() we want to move the eye along that vector by some amount that depends on the mouse horizontal movement. This gives us a translation vector that we use to compute a new eye position. Then we use this new eye position, the center of the camera and the world up axis to compute a new camera in m_camera.
Implement the "zoom" case.
Finally, the most difficult case is the rotate case. Again the center of the camera need to stay the same, and only the eye moves around. For that we need to perform two rotations: one vertical rotation around the horizontal axis of the camera (which can be obtained with m_camera.left()), and then an horizontal rotation around the world up axis.
These two rotations must be done on the vector const auto depthAxis = m_camera.eye() - m_camera.center(); that points from the center to the eye. Once totally rotated, we should obtained a new finalDepthAxis that points from the center to the new eye position. The new eye position is then obtained with const auto newEye = m_camera.center() + finalDepthAxis;. We should use this new eye position, the center of the camera and the world up axis to compute a new camera in m_camera.
To perform the rotation, you need to use the rotate function from glm that computes a 4x4 rotation matrix. For example:
1 | |
this code compute a rotation matrix of latitudeAngle radians around m_worldUpAxis.
Since we work with 4x4 rotation matrices, but we have vectors with 3 coordinates, don't forget to convert to vec4, then back to vec3:
1 | |
Implement the "rotate" case.
We can optimize a bit the rotate case by pre-multiplying the two matrices before applying it to the depthAxis, by using the first argument of glm::rotate.
Refactoring and switching between two controllers
Our two camera controllers are now very similar, with the same methods. Our drawing code makes use of getCamera(), setCamera() and update(). We can easily introduce an interface CameraController with these three virtual methods and make our two classed inherit from it. That way, we will be able to switch between them from the user interface of the viewer.
Add an interface CameraController as base class for FirstPersonCameraController and TrackballCameraController. In these two classes, use the C++11 keywork override to mark the overrided virtual methods.
If we want to easily switch between our two controllers, we need to manipulate a pointer to a CameraController instead of a variable to a concrete type in our run() method. We will use dynamic allocation and std::unique_ptr for that.
In run(), replace our TrackballCameraController cameraController with a std::unique_ptr<CameraController> cameraController that should be allocated with the function std::make_unique<TrackballCameraController>.
Finally, we will add the possibility to switch between the two controllers using radio buttons in the GUI. To learn how to use functions from ImGui, the best places are:
- On the internet, search for "ImGUI [THE WIDGET YOU WANT TO USE]"
- In the file third-party/imgui-VERSION/imgui_demo.cpp, that provides many examples
In my case, I forgot how to use radio buttons with ImGui so I just pressed Ctrl+Shift+F in my editor (VS code), search for "ImGui::RadioButton", and found examples in imgui_demo.cpp. Easy.
Also keep in mind that most ImGui functions returns true when the widget have been pressed, or changed state.
In the GUI, propose a radio button or a dropdown to select either the First Person Camera or the Trackball Camera. When you switch controller, don't forget to assign it the camera of the previous controller.