SDK and Git
This tutorial is based on the companion repository https://gitlab.com/gltf-viewer-tutorial/gltf-viewer. It contains a basic skeleton for the application, third party libraries and some utilities to build, run and debug the code.
In this section I will explain many concepts related to git. You can use it as a reference, but try to experience with them while reading the tutorial. Starting at subsection What is a branch ? I ask you to create a branch on which you can do whatever testing you want, and delete it after.
(Not so) Quick introduction to Git
Git is a software to handle versioning and collaboration on a repository. It is often used for source code, but it can be used to keep an history of modifications on any kind of files.
Using such tool is mandatory for software development projects: it offers security, history of changes and easy collaboration. Complete workflow and collaboration methodologies have been crafted on top of git (see the gitlab flow as a good example).
For this tutorial we will use Gitlab, but other providers exist such as https://bitbucket.org/ and https://github.com/.
It is important to understand that Git is a software while Gitlab, Github and others are online plateform providing git repository hosting (and other services). It is perfectly ok to use Git only locally, just for the versionning feature.
Creating a Gitlab account
If you don't have one already, create a Gitlab account on https://gitlab.com/ and log in to your account.
Forking the repository
Fork the repository: gltf-viewer. It can be done with the "Fork" button, top-right on the page.
Forking means cloning the repository on your own account. The platform keeps track of all forks of each repository.
With this copy, you can to do whatever changes you want and push them online for backup and collaboration with other people.
Installing Git
Install Git on your system if not already one.
On Linux, use your system package manager (apt for Ubuntu, pacman for Archlinux, etc).
On Windows, you can install Git for Windows at this URL. It will install Git on your system but also a bash terminal emulator allowing commands like cd, ls, ssh, ...
Clone your fork
Use the following command to clone your fork in a local folder named gltf-viewer:
1 2 | |
The base code template is at the tip of git branch tutorial-v1, so ensure you are on this branch using the command:
1 | |
VSCode and git
On VSCode you should install the Git Graph extension, offering you a graphic view of all commits of the repository:
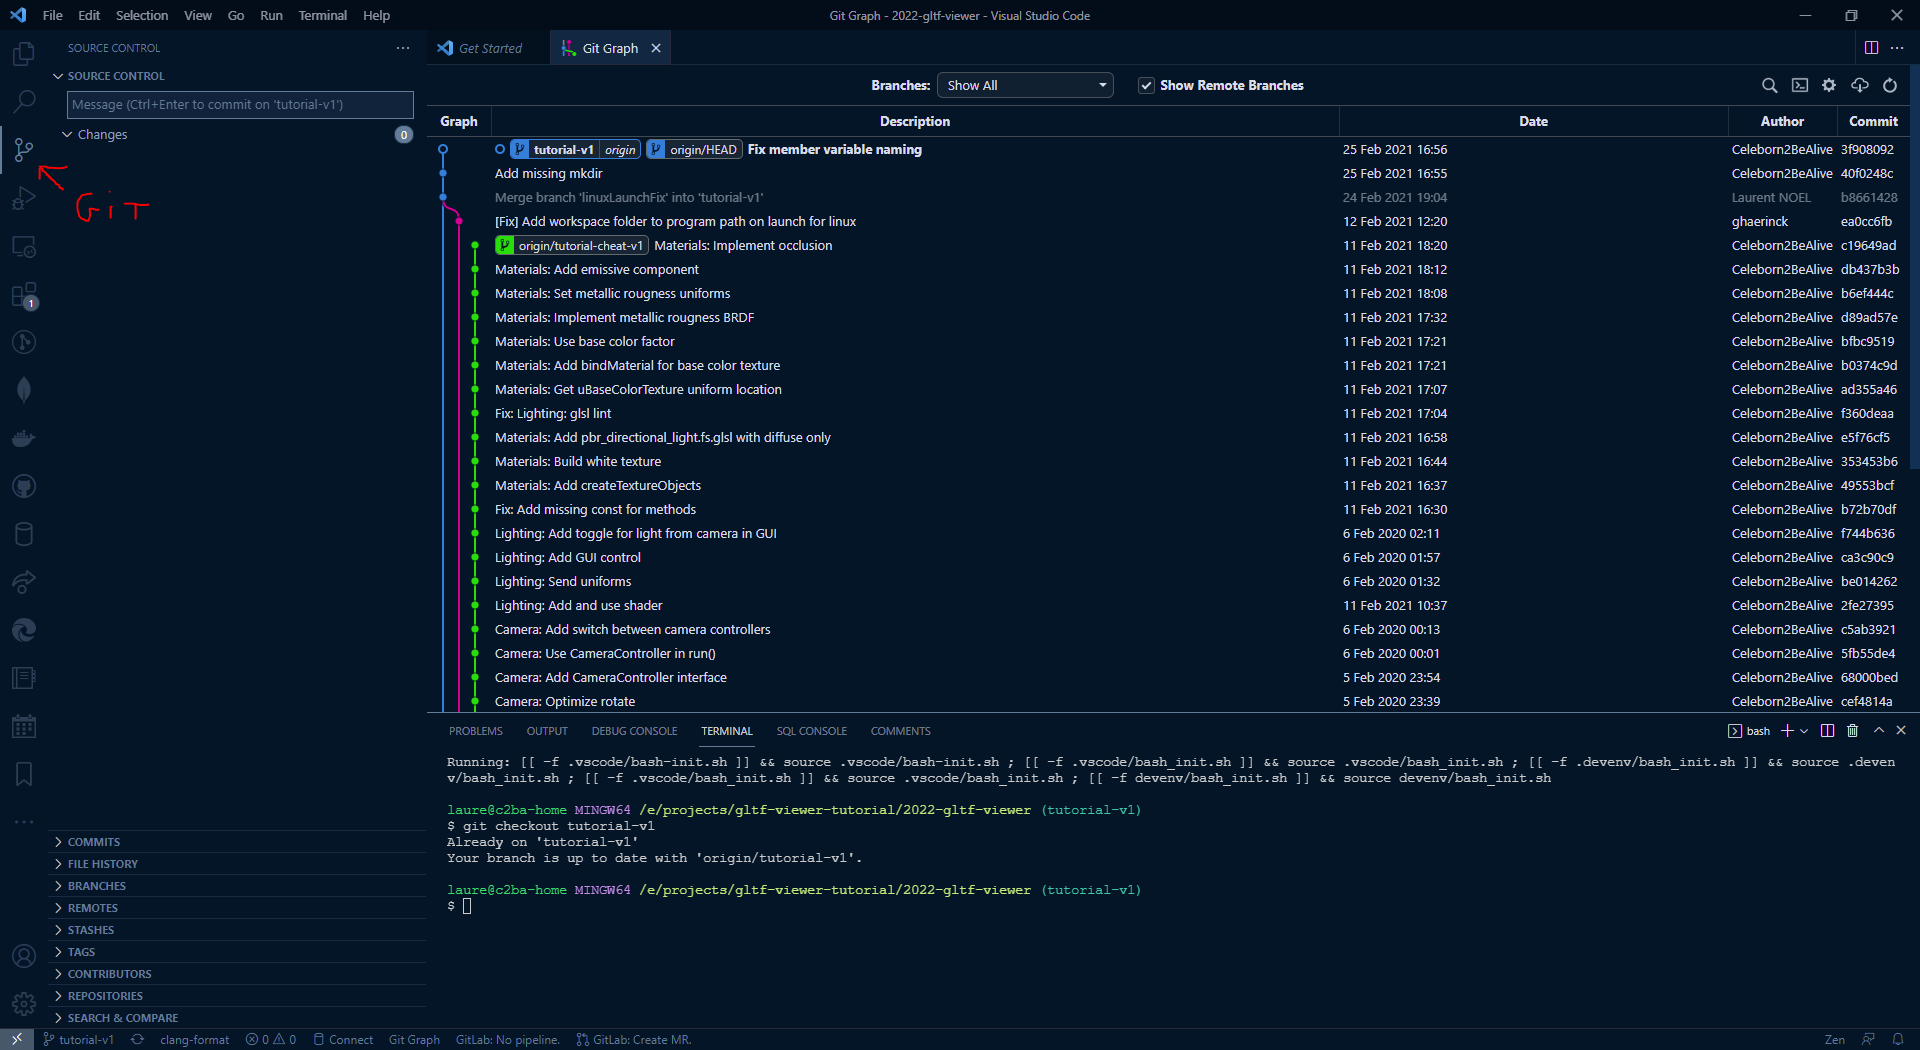
To access this view go to the Git panel on the left toolbar, then hover your mouse on the SOURCE CONTROL panel and you should see small icons appearing on top. Clic on the View Git Graph icon. Alternatively you can press F1 and search for git graph.
You can do several actions from the Git Graph user interface, but I strongly encourage you to learn Git commands with the terminal. Once you are used to it and how it works, then you can use the UI for some actions.
What is a commit ?
A commit represents a specific snapshot of your repository. It is identified by a hash, an hexadecimal number like 3f9080927ad07901be8100f5e670963662c36bfa. The first seven characters 3f908 are enough to identify and manipulate the commit using git commands.
Commits are organized in a tree structure. Most often a commit has one parent commit, but you can merge several commits together to create a new child commit with several parents.
What is a branch ?
A branch is a pointer to a specific commits. Git offers a data structure that is really close to the C language memory model: each commit has a unique hash which can be seen like its address, and we have branches (and tags) that are just pointers to commits.
You can create a new branch and switch to it using git checkout -b my-awesome-new-branch.
You can create a new branch at a specific commit using git branch a-new-branch <COMMIT_HASH>.
You can move to another branch using git checkout <BRANCH_NAME> or git switch <BRANCH_NAME>.
You can delete a branch using git branch -d <BRANCH_NAME>. If the branch have not been fully merged to your current location then Git will warn you and cancel the operation. You can force the deletion with git branch -D <BRANCH_NAME>.
What happens if you delete a branch not fully merged ? Then, if the branch was the only pointer to this commit and no other pointer exists to successors of the commit, you should see many commits disappear.
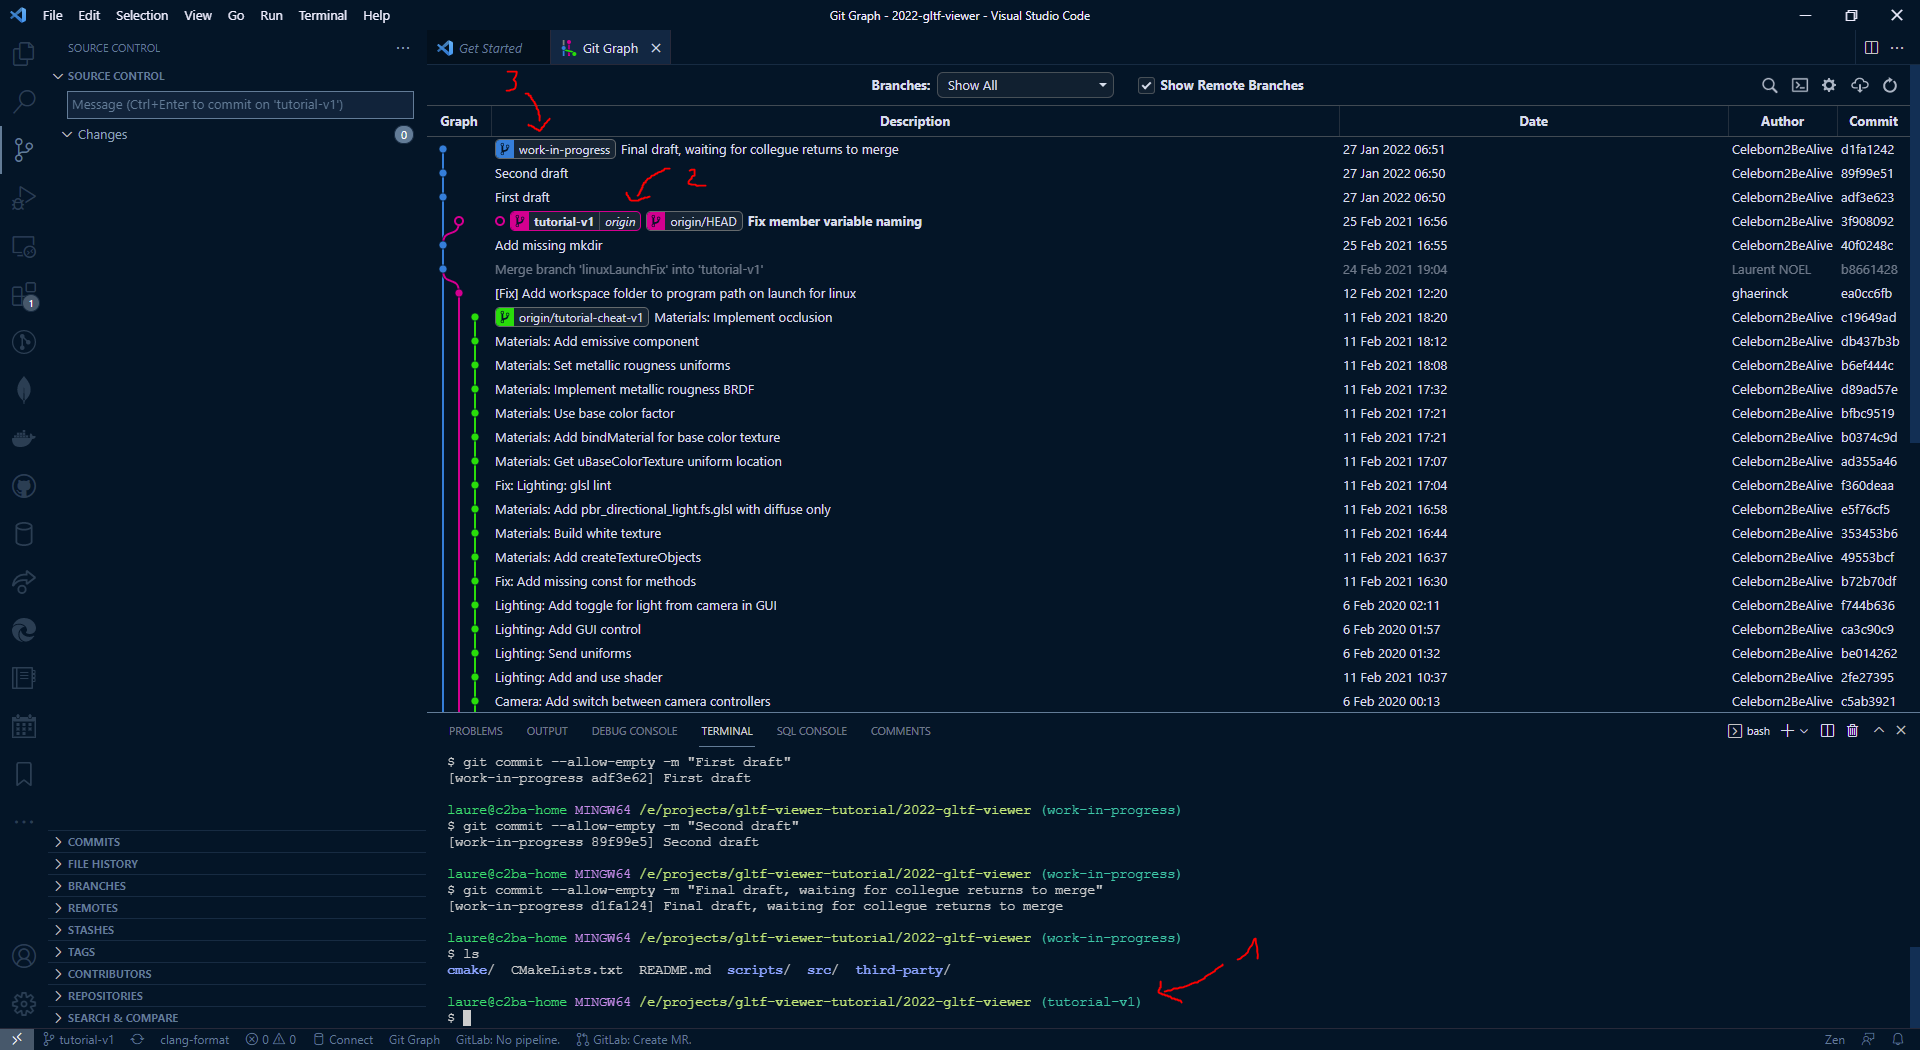
See the following example, On 1 and 2 we can see my location is tutorial-v1 branch, and the work-in-progress branch on 3 is not merged to my location (their commit history diverges):
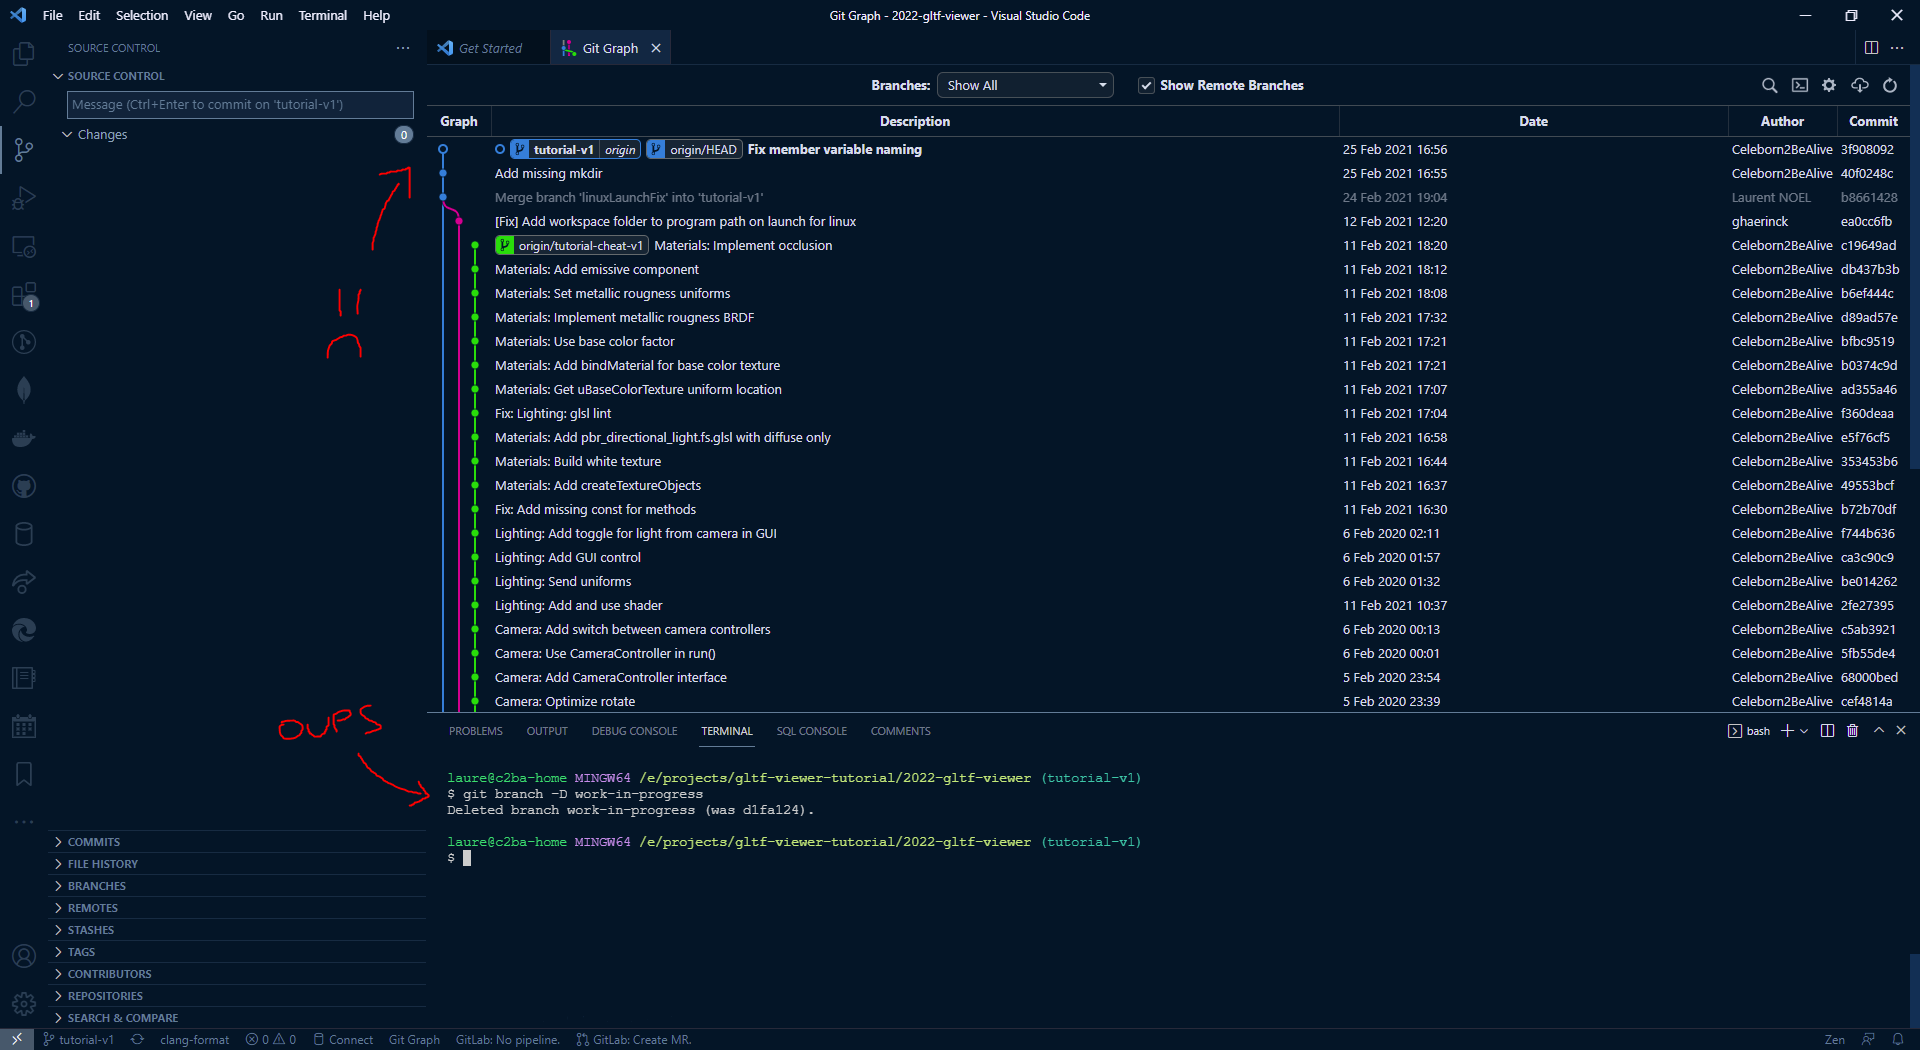
If I input git branch -d work-in-progress, here is what happen:
So, is everything lost ? No ! You can input git reflog that keeps an history of all commits that were checked-out for the past 30 days !
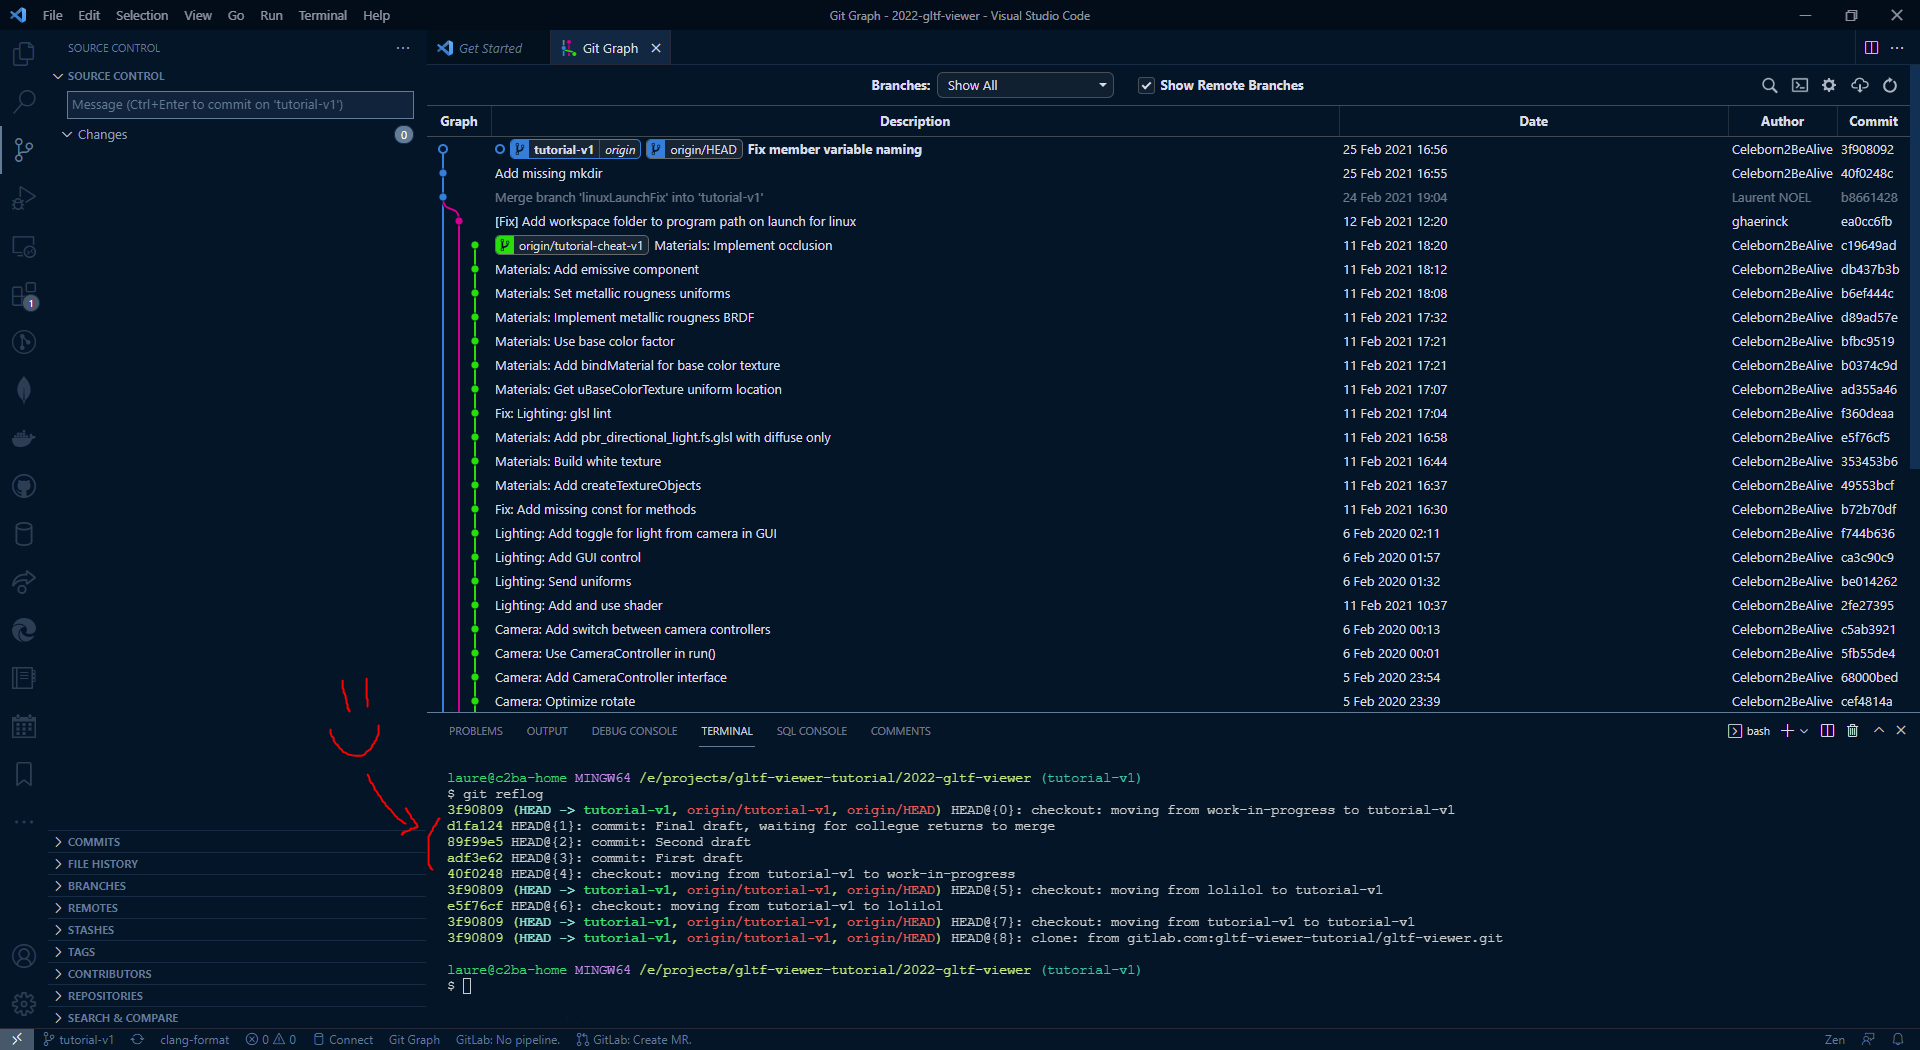
From there you can easily re-create a branch on one of the "lost" commit with git branch <BRANCH_NAME> <COMMIT_HASH>.
Create a new branch with git checkout -b wip to test various things explained on this section.
Create a new empty commit on this branch with git commit --allow-empty -m "An empty commit !"
Pushing a branch
You can push a branch to a remote repository to share your work with other developers, or to save your work online.
The first time you push a branch you should use the following command:
1 | |
The -u option is a shortcut for --set-upstream, origin is the name of the remote (automatically set when you clone). Setting the upstream of the branch means that your local <BRANCH_NAME> will track the remote branch origin/<BRANCH_NAME>. Tracking means that any future push will try to push your local <BRANCH_NAME> to the remote origin/<BRANCH_NAME>, and any future pull will try to download new commits created on the origin/<BRANCH_NAME> and integrate these commits on your local <BRANCH_NAME>.
If you work alone on a single computer it is likely you will never have to pull. But if you collaborate on a shared branch (like main) or work on several computers, then you will have to pull before committing and pushing. If you don't you will experience merge conflicts (which is something you will have to experience one day anyway).
Push your branch to your remote repository
What is a remote ?
A remote is a name for another copy of your repository. The git remote command gives you the list of remotes you have recorded on your local copy. The git remote get-url origin will give you the URL of the origin remote.
Remote allow synchronization between repositories. Each remote can have its own branches and commits, the commit history can diverge, and git offers you commands to synchronize correctly everything. But the core idea of git is to be decentralized: each repository can evolve independently from the other copies.
When you create a new git repository with git init it has no remote (don't run this command if you are already in a repostory). You can add a remote with git remote add <REMOTE_NAME> <URL>.
When working on open source projects it is common to fork the project on the hosting platform to have an independent copy. Then you clone your fork and its origin remote is set to the fork URL. You can then add a remote pointing to the official repository of the project to easily pull and merge the work of other contributors to your copy (especially the main branch, or importe development branches). We often name this remote upstream.
Add a new upstream remote pointing to my repository. Use the https URL: https://gitlab.com/gltf-viewer-tutorial/gltf-viewer
You can use git fetch <REMOTE_NAME> to download changes from a remote. The VSCode git extension do it automatically regularly.
Fetch changes from my repository.
What is HEAD ?
HEAD represents a pointer to your current location in the git tree. You can display it with cat .git/HEAD:
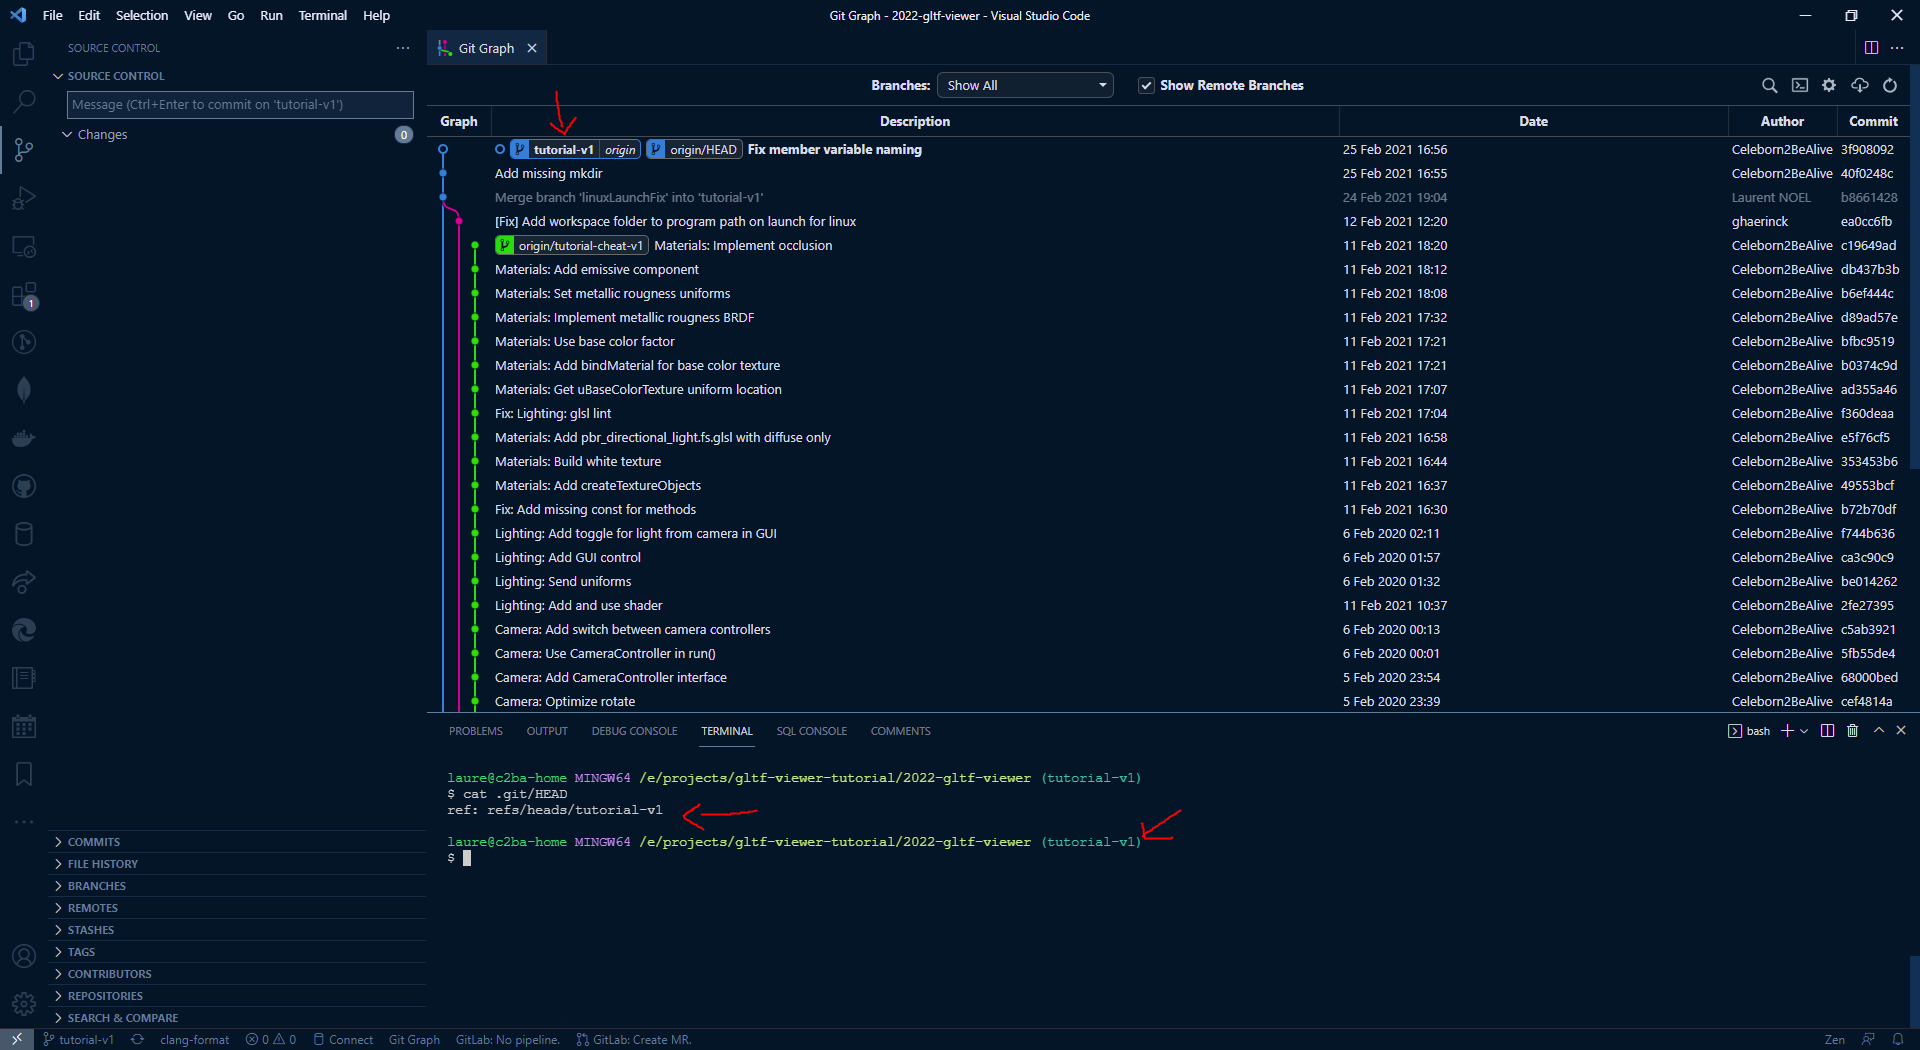
In Git Graph UI it appears bold, and most git terminal integrations display it on the command line.
On this example you can see my HEAD is a branch. If I try to check out a specific commit hash, I will be in a detached HEAD state, see how git warns me about this:

Being in a detached HEAD state means that I'm not located on any branch. So if I try to commit new changes the only pointer to new created commits is HEAD. If I check out another branch, then HEAD moves and the new commits disappear, exactly like when I delete an unmerged branch. I can still use the git reflog command to recover "lost" commits, but we avoid being in a detached HEAD state.
So when HEAD is not detached, it is a branch. In this state, the branch will automatically move when you commit new changes. We say that changes are commited on this branch.
Try to put yourself in a detached HEAD situation, create a few empty commits, then go back to a branch. Try to recover "lost" commits by creating a new branch on them.
What are unstaged changes ?
Unstaged changes are all modifications to files tracked by git. You can add these changes to the stage using git add <FILE>, or git add <FOLDER> (You can use git add . to add all changes).
Once changes are staged you can create a new commit from them with git commit -m "<MESSAGE>".
Change a few file and commit the changes on your test branch.
How to clean a branch history ?
Most often you work and commit on the flow, and you end up having a messy history of commits, hard to read. It is possible to rewrite the history of a branch using rebase and reset techniques.
The git reset <LOCATION> command will move your current branch to a chosen location (can be identified by a commit hash, a branch name, or a tag) but keep all current changes. It means that this command will not loose your work, it will just move the branch and let you with a lot of unstaged changes containing the state of the branch before it was moved. From this point you can do a single large commit of all your changes. This is called "squashing" commits together.
A more dangerous command is git reset --hard that move your branch but don't keep changes. Use it with caution (but you can still recover "lost" commits with git reflog).
Finally interacting rebasing is a very powerful technique to rewrite a complete branch history interactivaly. It is out of scope of this tutorial, but you can find good tutorials online:
- A Guide to Git Interactive Rebase, with Practical Examples - SitePoint
- Advanced Git Tutorial - Interactive Rebase, Cherry-Picking, Reflog, Submodules and more - YouTube ⏳ 34:00
How to merge a branch ?
Once you finish your work on a branch and you have clean its history, you often want to merge it to the main branch. The commands for that are:
1 2 3 4 | |
After that you can safely delete your branch (local and remote).
Working with branches and merge requests
I encourage you to try working with branches and merge requests, even if your work alone, since these are common tools used in Git workflows to collaborate efficiently on a project.
A merge request is a tool offered by Gitlab to track a branch and its differences with a target branch (often main, but can also be a release branch or a development branch). It allows other developers to review your changes, suggest modifications, comment, etc.
When you create a branch and push it the first time, git will give you a link to create a merge request. I encourage you to try. If you missed the link, you can still do it from Gitlab interface.
On Github you have pull requests that represent the same concept
If you are still on your test branch, then go back to tutorial-v1. From here you can choose how you want to work: commit and push directly on tutorial-v1, or create a new branch when you start a new code section of this tutorial (the next code section is Data initialization). Then at the end of the section you try to clean and merge your branch to tutorial-v1. Obviously I encourage you to try the second method.
References
Building the project
At this point we should be able to build the project with CMake. CMake is a tool that is used to generate build files. It is useful for multi-platform projects to avoid dealing with different build system (Makefile, Visual Studio solutions, etc.).
A CMake project can easily be spotted if you see a CMakeLists.txt file at the root of the project. This is the file that should be written to tell CMake how to build the project (what files to compile, what executables/libraries to build, etc).
Most of C/C++ projects are now written with a CMakeLists.txt file. It has became the main build solution of the C++ ecosystem, so it is important to know how to use it.
Install CMake
If you don't have CMake on your system, you need to install it.
On Linux, use your system package manager (apt for Ubuntu, pacman for Archlinux, etc).
On Windows, you can download the installer CMake at this URL. During the installation procedure, check the box that asks if you want to put CMake in your PATH variable. You will need to restart your terminal for this change to take effect.
Use CMake
When using CMake, we have 2 steps: 1. Configure the project with cmake - It generates the build solution (Makefiles for gcc, Visual Studio project for VS, etc) in a build folder 2. Compile the project with the native tool
The file .vscode/bash-init.sh contains a few bash functions to run the most common cmake commands we will use. To use them:
1 2 3 4 | |
Run the executable
Now that it is compiled, you should be able to run:
1 | |
which should display some information about your OpenGL version.
On windows you might need to add Debug folder in the path (or Release if you build in Release config):
1 | |
Base code
On order for you to quickly start, I have made a code template that must be completed during this tutorial.
The main.cpp file is already complete and just parse the arguments on the command line to forward them to the ViewerApplication class.
The ViewerApplication class has a constructor and a run() method. Most of the code should be implemented in the run() method, where I put comments of the form // TODO ....
Just follow the tutorial and you will know when to replace what.
Test scenes and commands
The .vscode/bash-init.sh also contains commands to download test files. If you have enough disk space, you can get all glTF sample models with:
1 | |
Otherwise, you can download these two models:
1 2 | |
The following utility commands allows to run the viewer of these two files:
1 2 | |
But don't expect to see anything but black before the end of the tutorial part "Loading and drawing".
Going further
Git
You can find more information about Git here, and thousands of tutorials online. I strongly advise you to learn how to do basic tasks on git from the command line such as:
- create a new repository
- cloning a repository
- attach a local repository to an online repository
- create branches, switch branches
- commit changes on a branch
- pushing and pulling changes
- merge branches
- use pull requests to send modifications from one repository to another
It is also possible to use graphical editors for Git, such as VS Code (with good extensions such as GitLens and Git Graph), Fork or Sublime Merge, but knowing how to do them on the command line is always good.
CMake
CMake can be a bit hard to learn "correctly" because it has evolved a lot in a few years. There is the old way of doing things, and the new way. When you search for tutorial, try to search for "modern cmake" instead of just "cmake". In the meantime, you can use the following resources that are recent:
Note that the Meeting C++ conference seems to feature a new talk each year about CMake, so you have no excuse to be up to date (ok I admit I didn't saw the last one, so my CMake code may be crap, I'll fix it later ^^').
Also keep an eye on the CMake version you are using. If it is your system you should have installed the last one. Otherwise you need to check the version with cmake --version and only use CMake commands that are allowed for your version (or ask the system administrator to update the version).